Friday, April 29, 2016

Mock cable stitch Cowl


This stitch is one of Aran patterns and
very popular in knitting, and crochet as well.

This will make you feel warm, 
give you a fancy look, beautiful  and unique stitch.


Good for ear warmer, scarves, cowl or even for blanket.


Materials needed:

4.5mm hook
Homemaker 8 ply acrylic in pink  colour
scissor

Special stitch
TR - Treble crochet

For the pattern 

Chain 36 plus 4 for turning chain,
or more, multiple by 6 plus 4


Row 1
dc to the 4th chain from hook
dc across 

Row 2
Ch3 count as first dc, turn
1dc next st
*Skip 2 sts

Work 1tr into each of next 2 sts,

keeping hook at the back 
work 1tr into the 2 skipped sts


1dc to the next 2 sts.,


 repeat from* to the end
dc next st
 end with dc into top of ch3.

Row 3 
Ch3, count as first dc, turn
1dc next st.,
* skip 2 sts (tr)
1tr to the next 2 sts., (Tr)
 this time, keeping hook at the front  


work 1tr into the 2 skipped sts


1dc to the next 2 sts., (dc)
repeat from* to the end.
dc next st.
work last dc top of ch3.


For row4, repeat row 2 and row 3 
until you have the desired length of your work.

For finishing
dc in every stitch across to end,
fasten off
weave ends.
Add some buttons to close

Hope you all enjoy this pattern as much as I do.

If you would like a PDF pattern please visit my Ravelry store

Thank you!

...MILINA...


Monday, April 11, 2016

How to Crochet Butterfly stitch


A beautiful crochet stitch with so much possibilities for it.
You can make anything you like as you can, 
it can be scarf, wrap around and most of all 
easy to follow pattern.


All you need: 
4.5mm hook or US #7 
4 seasons stallion 8 ply yarn 

I used Carnival 8 ply 100% acrylic yarn
hot pink yarn only for tutorial
Scissor


Stitches used and in US term
Dc- double crochet
Sc - single crochet
Hdc- half double crochet
For the pattern:

Ch48, plus 2 extra turning chain or
make chain as long as divisible by 12 plus 2 extra turning


Row 1 : Work 1sc to the 3rd chain from hook
and 1sc into each of chain to end.


Row 2 : Ch3, count as first dc, turn
3dc into same st 
*Ch4, skip 4sts.,
         1sc into each of next 3 sts

ch4, skip 4 sts., work 7 dc into next st.,
repeat from*
Ch4, skip 4 sts
1sc into each of next 3 sts
Ch4, skip 4 sts.,
4dc into 2nd ch of ch2.

Row 3 : Ch2 count as first hdc, turn
1hdc into each of next 3sts
*ch4, sc into 2nd st of 3 sts.

ch4, 1hdc into each of next 7 sts.,
repeat from* to end
ending with hdc into each of next 3 sts.,
1hdc into 3rd ch. of ch3.

Row4: Ch3 count as first dc, turn
1dc into each of next 3 sts
*3dc into ch4 space, repeat to the next ch4 space
1dc into each of next 7 sts., 
repeat from* to end
1dc into each of next 3 sts., 
1dc into 2nd ch of ch2.

Row 5 : Ch1 count as first sc, turn
1sc into each of next 5 sts
*ch3, skip 2 sts., 


1sc into each of next 11 sts., repeat from* to the end.
1sc into each of next 5 sts
1sc into the 3rd ch of ch3.

Row 6 : Ch3 to count as first dc, turn
work 3dc same st.
*ch4, skip 5 sts., 1sc into ch3 space
ch4, skip 5 sts, 7dc into next st
repeat from* to end
4dc into last chain
Row7 : Ch2 count as first hdc, turn
work 1 hdc into each of next 3 sts.,
*ch4, skip ch4 space
sc to the sc of previous row
ch4, skip ch4 space, 1hdc into each of next 7sts.,
repeat from*
ch4, skip ch4 space, sc next sc
ch4, skip next ch4 space
1hdc to the next 3 sts
1hdc into the 3rd chain of ch3

Repeat row4 to row7 
 until you have your desired length of your scarf.
fasten off
weave ends.

Hope you will like this pattern.

If you would like a PDF copy, can purchase here


Thank you for visiting my site!!!

MILINA


Monday, April 4, 2016

Princess dress

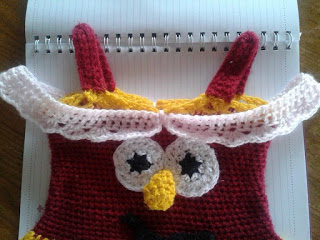
I made this Princess dress for my daughter when she was 1 year old, She loves Elmo since she was born and still loves it. So, Mummy had to come up with something and this is it! :)

12939646_953340864772828_1451250412_n.jpg


This is my owned design and i just decided to write the pattern recently, so if you find mistake or if you are confuse with this pattern, please let me know and I am happy to answer all your questions.

This dress measures 16 inches long, fits toddler 1-3 years old.
The  body measures 9 inches width.

The colours i used:
Red
Pink
Yellow
Black and White for the face

Materials:
5mm hook
4 seasons stallion 8 ply acrylic yarn
scissor

Here it is:

For the body
  • using red colour

Ch79, slip stitch to form a ring, be careful  not to twist it.

Row 1 : Ch1, sc 2nd chain from hook and sc in each stitch around.
            
             working in continuous round.

Row 2- 25 : Ch1, sc in each stitch around, slip stitch and fasten off.

  • Change to yellow colour

Row 26: Ch2, dc same stitch, work *1dc next st, 2dc next st.
               repeat* the entire round. slip stitch. Fasten off.

Row 27 : Change colour back to red
               Ch2, work dc in each stitch all around
               slip stitch to the top of ch2.

Row 28 : repeat row 27

Row 29 : Ch2, work 1dc,ch2,2dc same stitch,skip 2 sts.,
               *2dc, ch2, 2dc next st, repeat* to the end
                slip stitch to the top of ch2.

Row 30 : Slip stitch tot he V-Stitch space from the previous row, 
                ch2,work 1dc, ch2, 2dc same st.
               *2dc,ch2,2dc next v-stitch space repeat* to the end.
               slip stitch to the top of ch2.

Row 31: Ch2, 1dc in each stitch around. slip stitch to the top of ch2.

Row 32-36 : repeat row31. fasten off and change to colour light pink.

Row 37 : Ch2, work 1dc, ch2. 2dc same st
                *Skip 3 sts., 2dc, ch2, 2dc next st., repeat*
               slip stitch to the top of ch2.

Row 38 : Slip stitch to the v-stitch space, ch2
               work 1dc, ch2, 2dc same space
               *2dc, ch2, 2dc next v-stitch space
                 repeat* all around. slip stitch.

Row 39-  43 : repeat row38. Fasten off.

For edging, using yellow

Row 44 : Slip stitch to the middle of v-stitch space,ch2
               work 5dc same space
               *ch1,6dc next space, repeat for the next space to the end.
                ch1 and slip stitch to the top of ch2.

Row 45 : Ch1, work 1sc next st
                *Ch1, 1sc next st., repeast * to the end.
               slip stitch, fasten off and weave ends.

For the top of the body edging, using yellow colour
Row 1: insert hook and ch1, sc all around. slip stitch.
Row 2: ch2, work 2dc same st., *skip 3sts., ch1, 3dc next st., Repeat * to the end.

FOR THE STRAP ( Make 2)

Ch20
Row 1 : sc 2nd chain from the hook, sc across.turn
Row 2 :  *ch1, count as first sc, sc across
                repeat until you have 6 rows                          
                 tie up in the middle as you like making a bow 
               and sew the strap to the dress.
                 don't forget to measure.

For the decoration, this is optional and  only my idea but it looks good though :)

using colour pink and 5mm hook
ch88, slip stitch to form a ring
Ch1, work hdc in each stitch around.
slip stitch

ch2, work dc in each stitch around
slip stitch to the top of ch2

Ch2, work 1dc, ch1, 2dc same st., *skip 2sts.,
2dc, ch1, 2dc next st.
repeat* to the end of round
slip stitch to the top of ch2

fasten off
sew it at the top center of the dress as picture shown
make sure it is in the middle (both sides).


For the Elmo applique - I will write the pattern for it and post it here when finished 


Hope you all like my pattern.
If you would like a PDF pattern
Please check my Ravelry store

Thank you for visiting my blog!


MILINA