Showing posts with label granny square. Show all posts

Monday, June 19, 2017

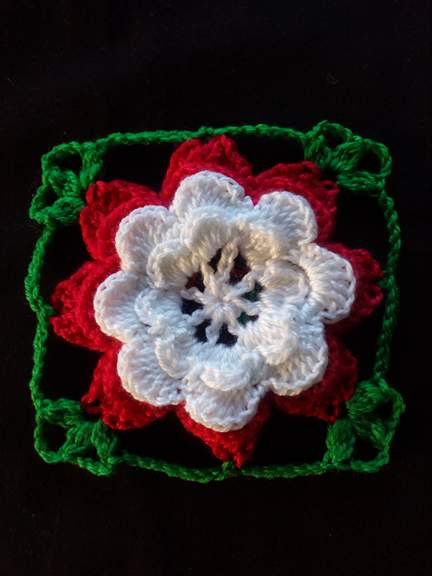
Granny square with Rose Motif Tutorial


l

If you love Rose, this pattern is for you and you can make your own granny square or anything that you like.

Here is the pattern with photos in it.

Materials:
 I used 5mm hook in my project
4 seasons stallion 8 ply 100%  acrylic
(Soft yarn for me as it is soft to work  and not scratchy)
 scissor
 needle for weaving ends

 colours i used:
 A - white
 B - red
 C- green
 D - Yellow

Stiches used and in US terms
dc - double crochet
hdc - half double crochet
ss - slip stitch
sc - single crochet
Tr- Treble

Cluster : work 3dc into center  tr of next petal,
keeping last loop of each dc on hook,  
              yarn over and draw through all 4 loops on  hook.

For the rose motif pattern:

This motif is worked in 4 colours

using A:
* Ch6, join with a ss to first ch to form a circle.
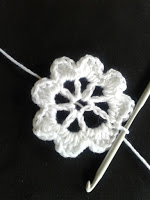
Round 1 :
Ch3, count as first dc
*Ch2, 1dc into circle, repeat from* 7x more (8 loops total)
Ch2, Join with a ss to 3rd   of first ch3.

Round 2 :
Into each ch2 space, *work ( 1sc, 1hdc, 3dc, 1hdc , 1sc)
Repeat* for the remaining next ch2 space
join with a ss to ss at the end of first round (8 petals)
Round 3 :
*Ch4, 1sc into next next sc of first round
repeat from * 7times more
ch4, join with a ss to ss at the end of 2nd round
keeping each ch4 loop behind the petals of the 2nd round.
Round 4 :
Into each ch4 loop, *work ( 1sc, 1hdc, 5dc, 1hdc, 1sc)
Repeat from* for the next ch4 loop ending with
join with a ss to ss at the end of 3rd round.
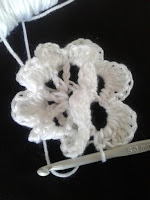
Round 5 : Repeat round 3,
working into the back of the sc of the 3rd round.
            fasten off.

Round 6 : Join B to ss at end of last round, into each ch4 loop,
*Work (1sc, 1hdc, 7dc, 1 hdc, 1sc)
Repeat from* to the end of ch4 loop
join with a ss to ss at end of 5th round.
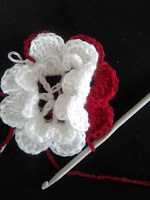
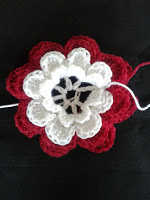
Round 7 : Using B, repeat row 3, working sc back of round 5.

Round 8 : In each ch4 loop,
*Work ( 1sc, 1 hdc, 2dc, 5tr, 2dc, 1hdc, 1sc )
Repeat from* to the next ch4 loop
Join with ss, fasten off

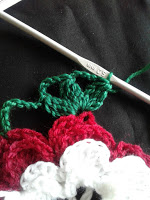
Round 9 : Join C to the center tr of any petal
Ch1 count as first sc, *ch7,
Work (cluster, ch4,cluster,ch4,cluster) in the next petal
Ch7, sc into the center tr of next petal
Repeat from*
Ch7, sl st, fasten off

19389487_1363568973750013_784215814_n.jpg


Round 10 :  Join D to the center cluster of one corner

Ch3 (count as first dc,)
2dc into top of same cluster
* Ch1,(3dc,ch1,3dc) next ch7 loop,
 Repeat to the next ch7 loop
Ch1, 3dc next ch4 space where cluster is,
Ch1, (3dc, ch3, 3dc) into the middle space cluster
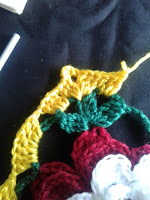
Ch1, 3dc next ch4 cluster space
Repeat from* until end of the round. slip stitch to close.
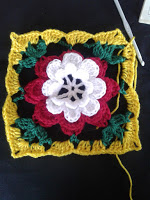
Round 11 :  
slip stitch 2x, until you reach the ch1 space,
Ch3,work 2dc same space
*ch1 and work 3dc next ch1 space until to the middle cluster
in the middle of the cluster, ch1 (work 3dc, ch3, 3dc,)
Repeat from* until the end of round. Slip stitch to close.
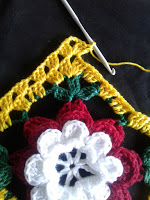
You can add another row or you can make it bigger just repeat round 11 to increase your granny square and the choice of your colors.

Please feel free to ask me if you have a question.

If you would like a PDF copy please visit my Ravelry store, thank you


Milinaxxx


Friday, November 4, 2016

How to join my shell granny square

I know, there are plenty videos on how to join your square, but as for me, I ended with shell stitch, I will show you how to join my square.

It's pretty easy but please bear with me as probably my instructions are not that clear, but hopefully I can justify with some photo tutorial :)

ROW 1:
To start : wrong side, facing together
using 4.5mm hook, same color yarn as your end shell part
insert hook to the 3rd dc of 5dc (Shell part)
ROW 2:
Ch1, sc in every stitch including the sc
between shell until the 2nd dc of 5dc.

Facing right side, insert hook to the 3rd dc of the other square

Pull the yarn
Slip stitch the yarn on your hook to join,
ch1 and work sc all around until the 2nd dc of 5dc (shell part)

When you connect to the middle
Insert hook to the 3rd dc of 5dc


Connect to the side square, sc together
insert hook to the 2nd dc of  5dc next square 
yarn over and slip stitch tightly back to the yarn on your hook
ch1


Repeat row 2


And continue with the other squares :)

Hope you all understand my pattern
If you have problem, please don't hesitate to send me a message <3

Thank you & Happy hooking!!!


Milina


Thursday, November 3, 2016

Shell Granny Square

Hello everyone, I'm here again :)

After finishing some orders, busy with kids as usual :) I came up with something, easy but beautiful pattern and I named it SHELL GRANNY SQUARE.


I was browsing Pinterest and looking for cover for my Coffee table, husband bought it for me, I meant for us lol,  I can't find anything, although there are some beautiful patterns for table runner out there still can't find one.

Anyway, I am a member of one of the crochet group over Facebook and there was a lady posting a beautiful, yummylicious biscuit if I am not mistaken, and it really catches my eyes and decided to turn into a beautiful crochet. I really thank her for posting it <3.


Beautiful isn't it?

If you are familiar with granny square and shell pattern, this will be an easy pattern for you.

For the materials:
5mm hook
any 8 ply yarn (according to your choice)
scissor
yarn needle for weaving ends

To begin with:
Ch5,  join first st. to form a ring


Row 1:  
Into the ring, work ch3 (dc, ch1,dc)
*ch2 (dc,ch1,dc,ch1,dc)
repeat* until you have 4 groups of dc's
ch2, slip stitch top of ch3
Fasten off


Row 2:
Change color, insert yarn and hook in any ch2 space,
(ch4,dc,ch1,dc, ch2, dc,ch1,dc,ch1,dc) same space
*ch2, skip 3dc, dc,ch1,dc,ch1,dc, ch2 , dc,ch1,dc,ch1,dc)
repeat* 
ending with ch2, slip stitch to the top of ch3. (Total of 4 groups)
Fasten off


Row 3:
Change color, insert yarn and hook in between of 3dc's group
(ch4,dc ch1 dc, ch2, dc ch1 dc ch1 dc) same space
*ch2, skip 3dc, dc,ch1,dc,ch1,dc to the ch2 space
ch2, skip 3dc work ( dc,ch1,dc,ch1,dc, ch2, dc,ch1,dc,ch1,dc) 
into ch2 space (middle of the 3dc's group) repeat* all around
ending with ch2, slip stitch to the top of ch3. Fasten off


*Note: 
  I am weaving the ends in this part or you can leave it to the end if you like.
  
  When you weave the first row, don't close it to the end.

leave the hole open


Row 4:
For this row, we will do the shell pattern

 
Insert yarn and hook in the ch2 space (middle space of the 3dc's group)
 ch3, work 4dc same space, 
 sc in the 2nd dc of 3dc. 
 5dc to the ch2 space
 sc in the 2nd dc of 3dc
 *5dc to the ch2 space 
 sc in the 2nd dc of 3dc
 repeat* all around
including the 3dc's group.


ending with sc in the 2nd dc of 3dc, slip stitch to the top of ch3.
Fasten off, weave ends and you're done!


You can make as many as you want, that's what  I am doing for my coffee table, I will post my finished cover when done.

Hope you all like my pattern, if you find some mistake, please let me know and I am happy to fix it. :)
 

Happy hooking!!!


MILINA


Sunday, June 26, 2016

Flower granny square blanket

Another blanket I am making is a gift for my mum, ( still in progress) can't wait to finished it and send it to her to the Philippines. Everytime we had a video conference she always give me a hint that She loves my seat cover made of granny square in a different colours.

This time I am making for her


For this blanket, I started it with flower motif instead of the regular granny square.

Flower pattern is from Redheart with free printable, link here

In row 4 instead of 2dc in ch1 space, I work 3dc in every ch1 space.
Repeat row 4 until your square become bigger.

Happy crocheting!!!

With Love,
Milina

Crochet granny square

When I started my crochet hobby, the first thing I saw
was a granny square blanket, and I told to myself one day I will learn it,
fair enough I did 😊


I made my first scarf using cotton but not long enough but at least I did.


I know some of us can't resist granny square stitch, so many potentials
and not hard to make.


I decided to share the way I crochet granny square,
I know some of us have a different ways to do it but I'm happy to share mine.


Grab your hook and yarn and crochet along with me 😊😀


With your 5mm hook or you can use any hook that you are comfortable with


Start with chain 4 to form the center of the motif.
Chain 2 count as first DC, 2dc into ring,* ( ch2,3dc,ch2)  repeat*
until you have 4 groups of 3dc.
Ch2, slip stitch top of ch3. fasten off.


Row 2:
change to white colour,
join in to any ch2 space, ch3, ( 2dc, ch2,3dc) same space to form corner,
*ch1, (3dc,ch2,3dc) next ch2 space repeat until you have 4 corners.  
slip stitch top of ch3.
fasten off.
Row 3:
Join orange colour in any ch2 space,
ch2, (2dc,ch2,3dc)same stitch. ch1, in ch1 space work 3dc,
*ch1, to the ch2 space, (3dc,ch2,3dc) ,
ch1 3dc next ch1 space, repeat* to complete the row,
slip stitch top of ch3,.
fasten off.

Repeat row 3 until your square become bigger.
Just remember in every corner work (3dc,ch2,3dc)
and to the ch1 space work 3dc. 


Hope this will help.
If you have question or find errors feel free to message me. Thank you


Happy crocheting everyone!!!


With love,
Milina